Unlock your full creative potential in Roblox Studio by mastering how to edit Roblox Studio record settings. This comprehensive guide provides US gamers, from casual creators to aspiring developers, with the essential steps and expert tips needed to fine-tune their video capture for optimal performance and quality. Learn to adjust resolution, frame rate, audio inputs, and more, ensuring your recorded gameplay or development sessions are crisp, clear, and perfectly represent your vision. Whether you are creating tutorials for your community, showcasing new game features, or simply documenting your progress, understanding these settings is crucial. We address common challenges like laggy recordings, large file sizes, and audio sync issues, offering practical solutions that fit into a busy gamer's life. Discover how optimizing these settings can elevate your content, streamline your workflow, and help you connect better with your audience without breaking the bank or sacrificing precious gaming time. Dive in to enhance your Roblox Studio recording experience today.
Related games- Guide How to Find Best Roblox ID Images for Your Creations
- Guide to Roblox Clothes Codes 2024 Ultimate List
How do I open the recording settings in Roblox Studio?
You can access the recording settings by opening your Roblox Studio project, navigating to the 'View' tab at the top, and then clicking on 'Video' or 'Recorder'. This will reveal a small panel with a gear icon. Clicking this gear icon will bring up all your customizable recording options for resolution, frame rate, and output location.
What are the best video quality settings for my Roblox Studio recordings?
For most creators balancing quality and performance, 1080p resolution at 30 or 60 frames per second (FPS) is ideal. If your PC is powerful, 60 FPS offers smoother video, perfect for showcasing fast gameplay or intricate animations. For older systems or quick captures, 720p at 30 FPS provides a good balance and smaller file sizes.
Can I record my voice and game audio simultaneously with Roblox Studio's recorder?
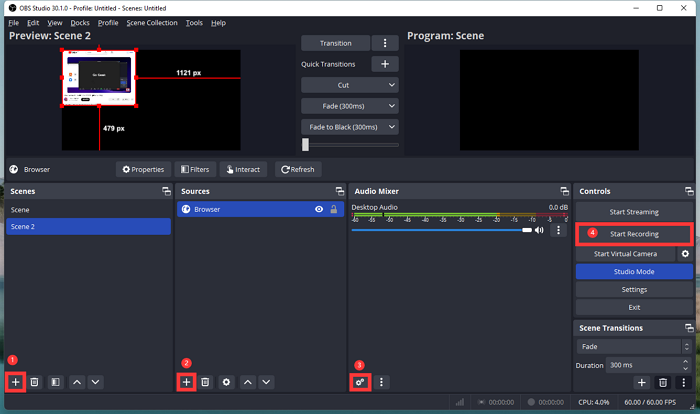
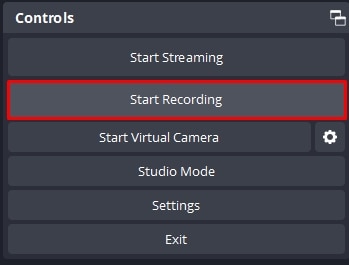
Unfortunately, Roblox Studio's built-in recorder focuses primarily on video and in-game audio capture. It doesn't natively support recording your microphone input. To capture both your voice commentary and game audio, you'll need to use third-party recording software such as OBS Studio or NVIDIA ShadowPlay.
Why are my Roblox Studio recordings choppy and how can I fix it?
Choppy recordings often result from your PC struggling to keep up. Ensure you close unnecessary background programs, update your graphics drivers, and try saving recordings to a faster drive like an SSD. Reducing the recording resolution or frame rate (e.g., to 720p 30FPS) in the settings can significantly improve smoothness.
How do I change where my recorded Roblox Studio videos are saved?
In the recording settings window (accessed via the gear icon), look for an option labeled 'Output Folder' or 'Save Location'. Click the 'Browse' button next to it and select your desired folder. This helps keep your projects organized and prevents your primary drive from filling up with large video files.
What file format does Roblox Studio use for recordings, and can I change it?
Roblox Studio's built-in recorder typically saves videos as WMV (Windows Media Video) files. You cannot change this format directly within Studio. If you need a different format like MP4, you will either have to convert the WMV file using external software or use a dedicated third-party recorder from the start.
Are there advanced options like bitrate control or region recording in Roblox Studio?
No, Roblox Studio's recorder is quite basic. It lacks advanced features like bitrate control, selective screen region recording, or webcam overlays. For these more sophisticated options, creators typically turn to robust third-party recording software which offers a full suite of customization tools for professional content creation.
Hey fellow gamers and creators! Ever found yourself deep into a Roblox Studio project, building something awesome, and thought, "I should record this"? Or maybe you're trying to capture that epic moment in your game for a tutorial or a showcase video, only to find the recording is a choppy mess, the audio is out of sync, or the file size is so huge it eats your hard drive for breakfast. You're not alone. Balancing our love for gaming and creation with jobs, families, and life responsibilities often means we need to make the most of our limited time. US gamers, with an average age around 36, are actively seeking ways to optimize their experience, whether it's for relaxation, skill-building, or connecting with friends. With 87% of gamers playing regularly and many dedicating 10+ hours a week, efficiency and quality are paramount. This guide is your friendly co-pilot, designed to help you master how to edit Roblox Studio record settings, ensuring your captures are smooth, professional, and ready to share, all without the usual headaches. Let's dive in and elevate your Roblox content game!
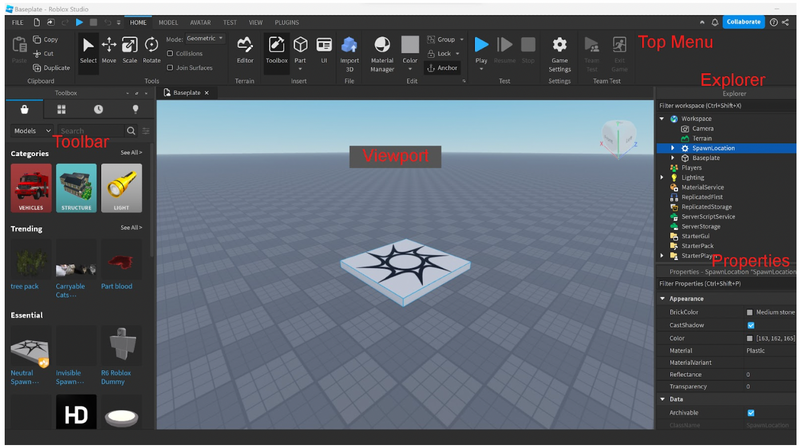
How Do I Access Recording Settings in Roblox Studio?
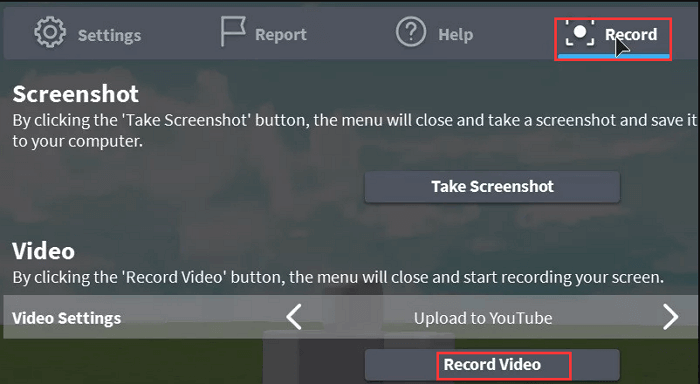
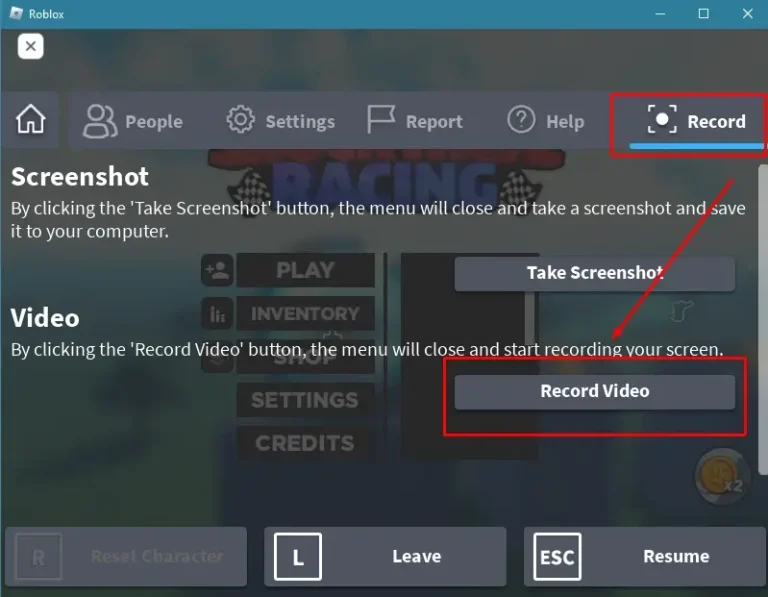
Accessing the recording settings in Roblox Studio is surprisingly straightforward once you know where to look. Unlike some applications where recording options are buried deep, Roblox Studio integrates them quite intuitively. The primary way to get to these settings is through the built-in video recorder. When you're in a Roblox Studio project, look for the 'View' tab at the top. From there, you'll usually find an option related to 'Video' or 'Recorder'. Clicking this will often open a small toolbar or a panel that houses your record and stop buttons, and crucially, a settings icon – typically a gear symbol. This gear icon is your gateway to customizing frame rates, resolutions, and more. For many busy creators, this quick access means less time searching and more time creating compelling content, a key factor for gamers balancing their passion with life's demands. Remember, efficiency in tools helps you keep pace with current trends, like the booming social gaming scene, without sacrificing quality.
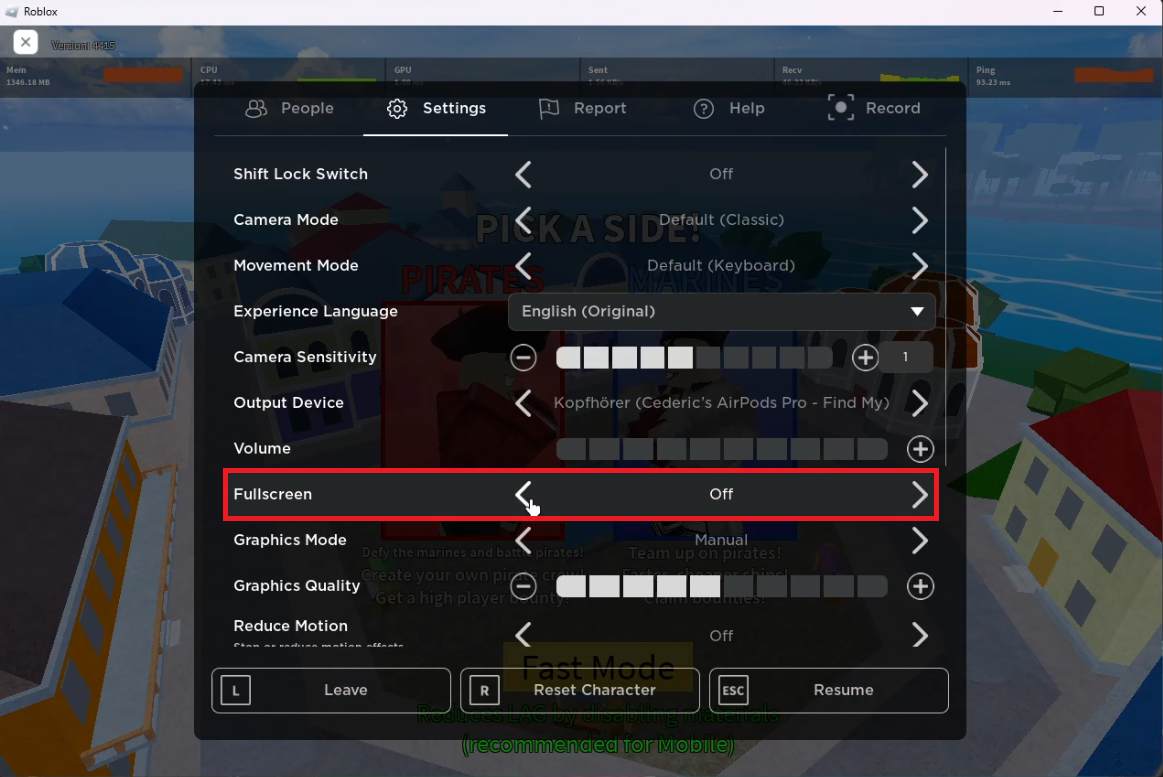
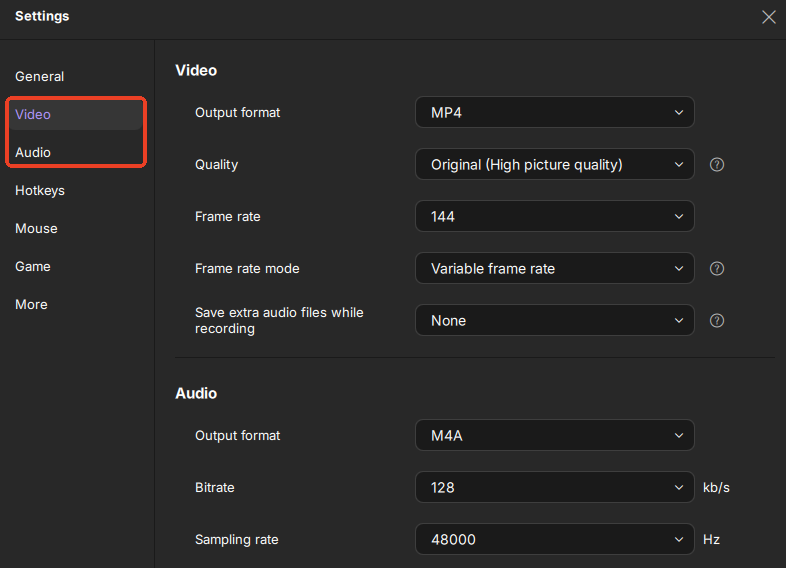
What Recording Quality Options Are Available in Roblox Studio?
Roblox Studio provides several quality options to cater to different needs, balancing visual fidelity with file size. When you delve into the recording settings, you'll typically find choices for video resolution and frame rate. Resolutions often range from standard definition (SD) like 480p, to high definition (HD) such as 720p and 1080p. The frame rate, measured in frames per second (FPS), usually offers options like 30 FPS or 60 FPS. Choosing a higher resolution and frame rate results in a crisper, smoother video, but it also means significantly larger file sizes and requires more processing power from your PC. For gamers showcasing complex builds or fast-paced action, 1080p at 60 FPS is ideal. However, for quick tutorials or sharing early development snippets, 720p at 30 FPS might be sufficient and much easier on your storage and upload bandwidth. Consider your audience and purpose: a short mobile-optimized clip might need lower settings, while a detailed PC-focused walkthrough benefits from maximum quality. This flexibility allows creators to optimize content for various platforms, a vital consideration given the dominance of mobile gaming and cross-play trends among US gamers today.
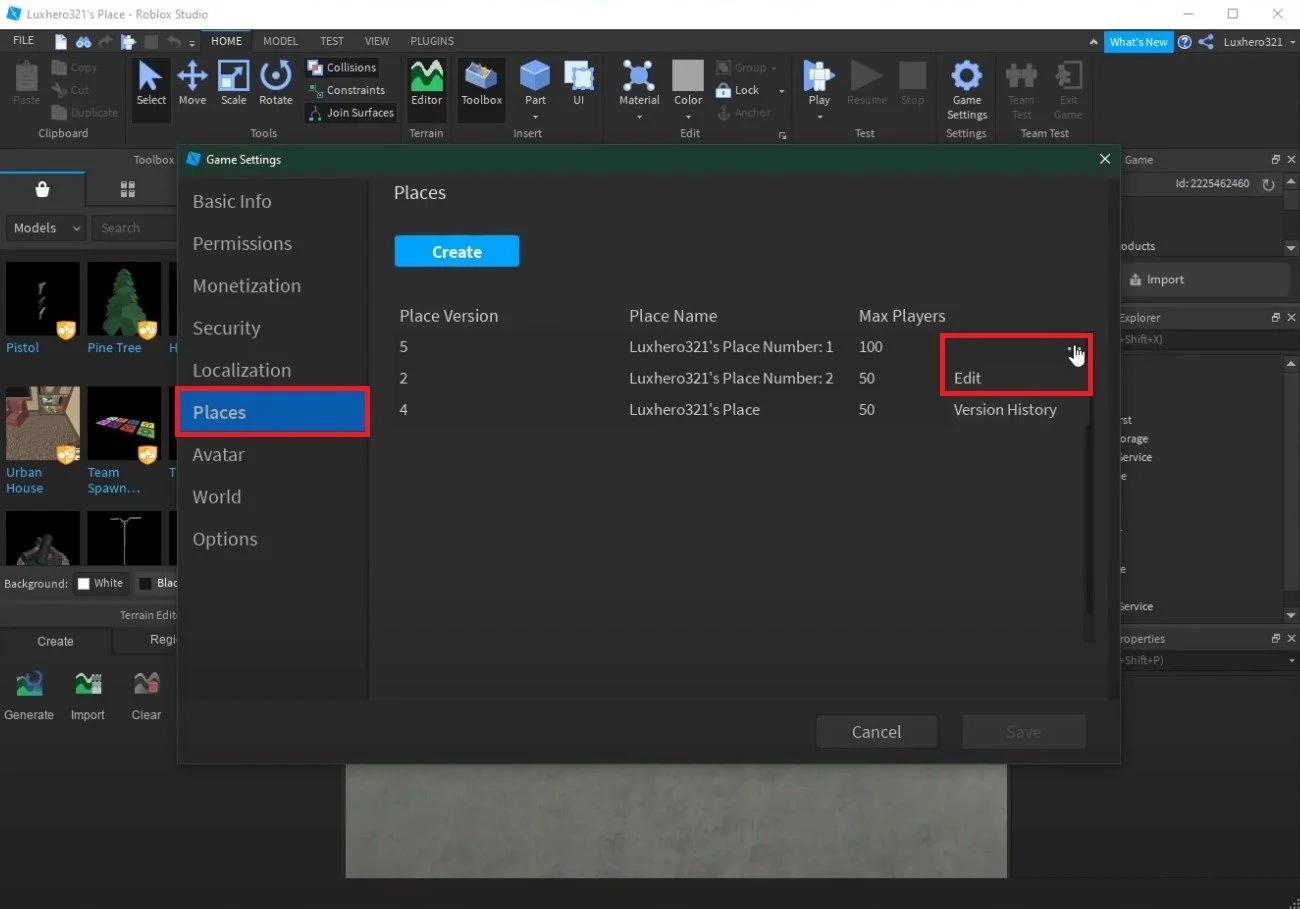
Can I Change the Recording Output Folder in Roblox Studio?
Yes, you absolutely can change the recording output folder in Roblox Studio, and it's a critical step for good file management, especially for active content creators. By default, Roblox Studio often saves your recordings to a generic folder, which can quickly become cluttered or difficult to locate. To customize this, navigate to the recording settings (usually via the gear icon in the recording toolbar). Within these settings, you should see an option labeled "Output Folder" or "Save Location." Clicking a 'Browse' button next to it will allow you to select any folder on your computer. Many gamers find it helpful to create a dedicated folder for all their Roblox Studio projects and recordings, perhaps even subfolders for specific games or tutorial series. This keeps everything organized, making it easier to find, edit, and upload your videos. For gamers who juggle multiple projects and limited hard drive space, this simple organizational trick is a game-changer, preventing performance problems caused by a full system drive and ensuring a smoother content creation workflow.
How Do I Adjust Frame Rate (FPS) for Roblox Studio Recordings?
Adjusting the frame rate (FPS) for your Roblox Studio recordings is straightforward and can dramatically impact the smoothness of your final video. Within the recording settings window, look for an option typically labeled "Frame Rate" or "FPS." Here, you'll usually find a dropdown menu or a selection of common frame rates like 30 FPS and 60 FPS. For most general recordings, 30 FPS is adequate and will produce a decent video while keeping file sizes manageable. However, if you're capturing fast-paced gameplay, intricate animations, or want a more professional, fluid look for your showcases, bumping it up to 60 FPS is highly recommended. Keep in mind that recording at 60 FPS requires more system resources, so ensure your PC can handle it without dropping frames, which would make the video appear choppy. Experiment with both settings to find the sweet spot for your hardware and content type, ensuring your viewers get the best possible experience. Smooth visuals are key for engaging modern audiences, especially with the prevalence of high refresh rate monitors among serious gamers.
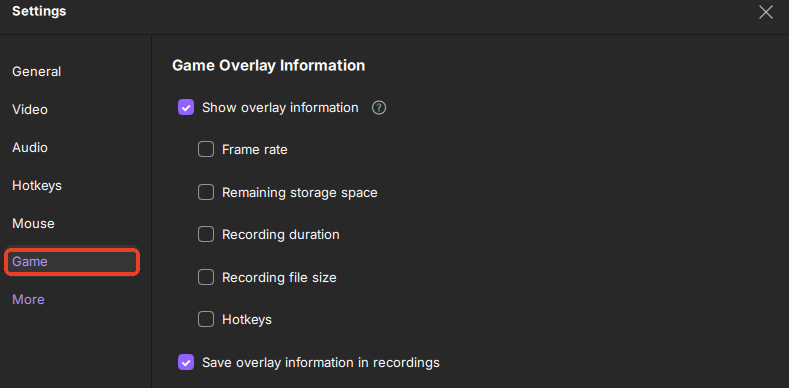
Are There Any Audio Recording Options in Roblox Studio?
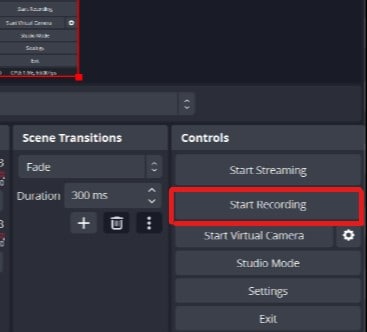
Unfortunately, as of recent updates, Roblox Studio's built-in recorder typically focuses solely on video capture and does not offer extensive in-app audio recording options. This means it usually captures only the in-game sounds directly from the Studio environment, and you won't find specific settings for microphone input or advanced audio mixing within the recording panel itself. For creators who need to add commentary, background music, or external sound effects, you'll need to rely on third-party recording software like OBS Studio, NVIDIA ShadowPlay, or Xbox Game Bar. These external tools provide comprehensive audio controls, allowing you to record multiple audio tracks simultaneously (e.g., game audio, microphone, Discord chat) and adjust their levels independently. This is a common workaround for many US gamers and content creators, who often already use such software for streaming or general gameplay recording. While it adds an extra step, it offers far greater flexibility and control over your audio, which is crucial for producing high-quality, engaging content that resonates with viewers.
Why Are My Roblox Studio Recordings Laggy or Choppy?
Laggy or choppy Roblox Studio recordings are a common frustration that can stem from several factors, especially when your PC is juggling Studio, recording, and potentially other background tasks. One primary culprit is insufficient system resources; recording high-resolution or high-frame-rate video (e.g., 1080p at 60 FPS) demands a powerful CPU and GPU. If your computer struggles, frames will drop, leading to choppiness. Another common issue is a slow hard drive; if your drive can't write the video data fast enough, the recording will suffer. Try saving to an SSD if possible. Additionally, having too many programs open in the background, a lack of RAM, or an outdated graphics driver can all contribute to performance degradation. Ensure your Roblox Studio is up-to-date and your drivers are current. Reducing the recording resolution or frame rate in the settings can often mitigate this. For gamers who balance work and play, optimizing system performance is key to a smooth experience, both in-game and during content creation, preventing those frustrating setup issues that eat into valuable time.
What File Formats Does Roblox Studio Use for Recordings?
Roblox Studio's built-in recorder typically outputs video files in the WMV (Windows Media Video) format. WMV is a proprietary Microsoft format that is generally well-supported on Windows systems and by many video players and editing software. While WMV files are broadly compatible, they might not be the preferred format for all content creators, especially those working on different operating systems or with specific editing suites that favor formats like MP4. WMV files can also sometimes be larger than comparable MP4s, which is a consideration for storage and upload speeds. If WMV isn't ideal for your workflow, you'll need to use a video converter tool to change the format after recording or, as mentioned before, utilize third-party recording software. External recorders usually offer a wider array of output formats, including the highly popular and efficient MP4, which provides excellent quality-to-file-size ratio. This flexibility is essential for creators who need to quickly get their content from Studio to platforms like YouTube or Discord, engaging with their communities effectively.
Are There Any Limitations to Roblox Studio's Built-in Recorder?
While Roblox Studio's built-in recorder is convenient for quick captures, it does come with several limitations that creators should be aware of. As discussed, its audio capabilities are minimal, usually only capturing in-game sounds without microphone input. There's also a lack of advanced customization options; you won't find features like region selection (recording only a specific part of the screen), webcam overlays, or sophisticated bitrate controls that external software offers. The output format is generally limited to WMV, which may require conversion for broader compatibility. Furthermore, the recorder's performance can be more resource-intensive compared to optimized third-party tools, potentially leading to frame drops on less powerful machines. For serious content creation, especially if you're looking to stream or produce polished videos with commentary and complex overlays, a dedicated third-party recording solution is almost always a better choice. However, for a fast, no-frills clip, Studio's recorder gets the job done and is perfect for quick internal documentation or sharing a concept quickly within your team.
Conclusion
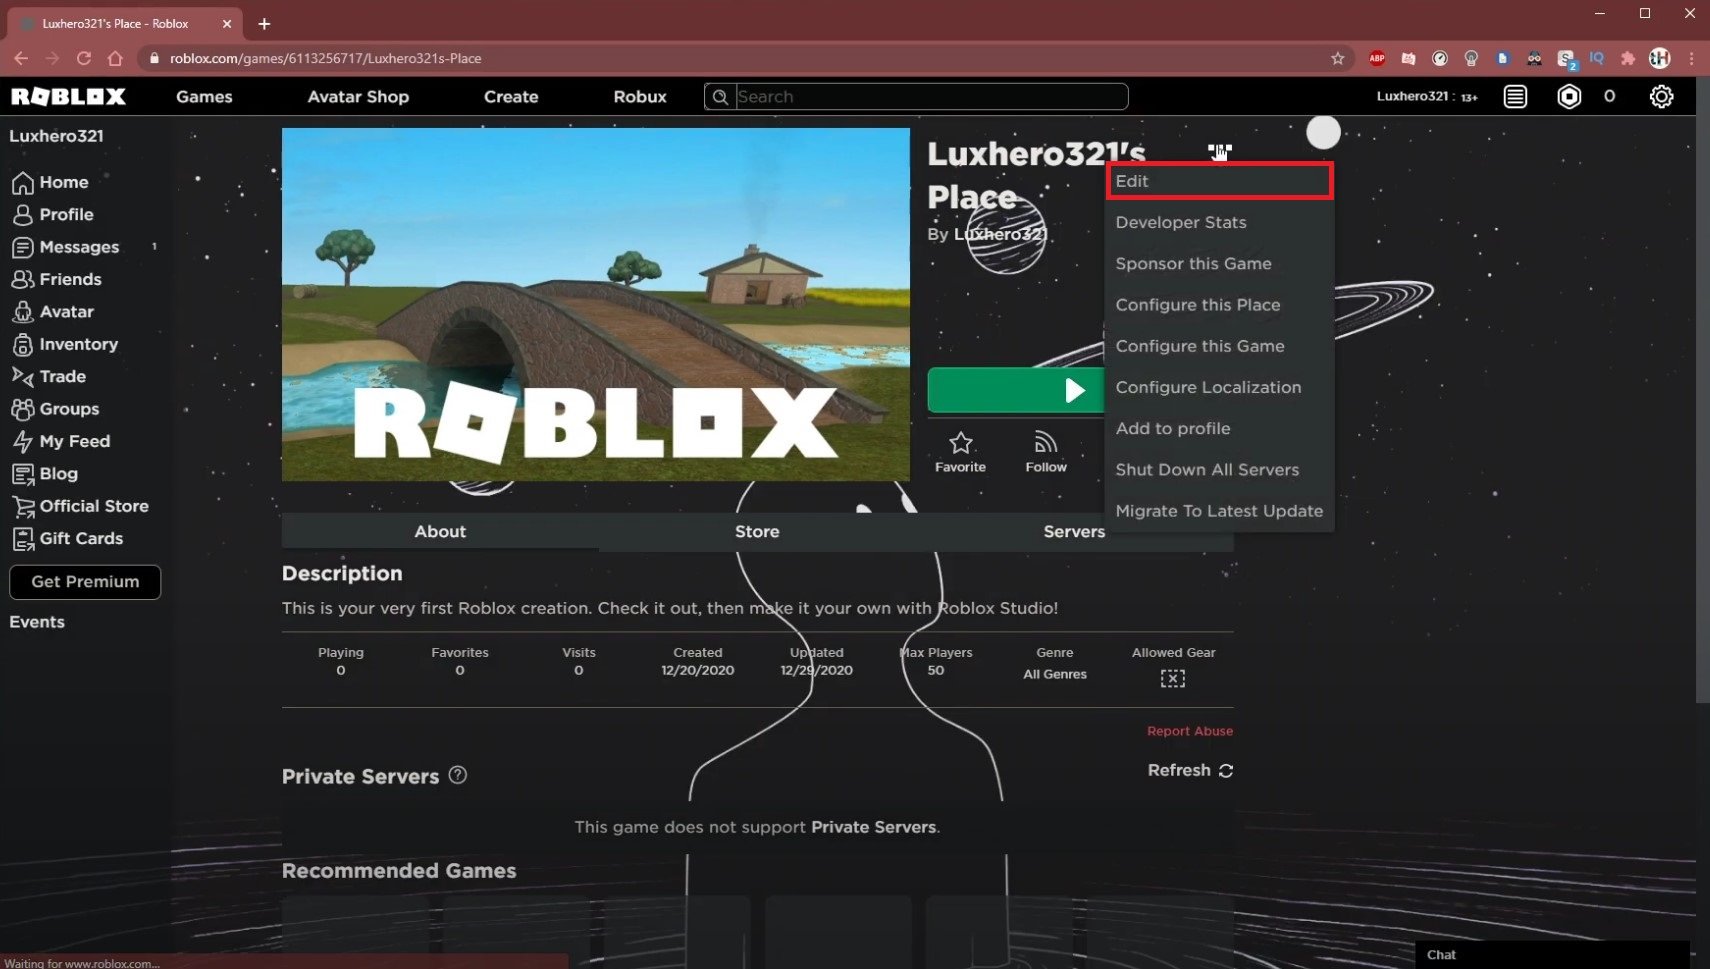
Mastering how to edit Roblox Studio record settings is a valuable skill for any aspiring developer or content creator in the Roblox ecosystem. By understanding how to adjust your resolution, frame rate, and output location, you can significantly enhance the quality and efficiency of your video captures, ensuring your creations shine. While the built-in recorder has its limitations, knowing how to optimize its capabilities, or when to switch to third-party tools, empowers you to produce engaging content that resonates with fellow gamers. This keeps your workflow smooth, allowing you more time to build, play, and connect with the thriving Roblox community. What's your biggest gaming challenge when creating content for Roblox? Comment below!
FAQ Section
Can I record my microphone audio directly with Roblox Studio?
No, Roblox Studio's built-in recorder generally does not support direct microphone audio input. You'll need to use third-party recording software like OBS Studio to capture your commentary alongside your video. This allows for better control over audio mixing and quality.
What is the best resolution for Roblox Studio recordings?
The best resolution depends on your hardware and target audience. For high-quality, professional-looking videos, 1080p is ideal if your PC can handle it. For quicker uploads or less powerful systems, 720p offers a good balance of quality and performance. Consider where your content will be viewed, such as mobile vs. large monitors.
How can I reduce the file size of my Roblox Studio recordings?
To reduce file size, you can lower the recording resolution (e.g., from 1080p to 720p) and frame rate (e.g., from 60 FPS to 30 FPS) in the settings. Using a third-party recorder that offers MP4 output and custom bitrate settings will also significantly help, as MP4 is generally more efficient than WMV.
Does Roblox Studio support recording in 4K?
Roblox Studio's built-in recorder does not typically offer 4K recording options. For capturing content in 4K resolution, you would need to use advanced third-party recording software that supports higher resolutions and can leverage powerful GPUs to handle the immense data. Most creators stick to 1080p or 1440p for optimal balance.
Where are Roblox Studio recordings saved by default?
By default, Roblox Studio recordings are usually saved to a folder within your Documents or Videos directory, often in a subfolder named 'Roblox' or 'Roblox Studio'. You can easily change this default location in the recording settings to a more convenient folder of your choice, which is highly recommended for organization.
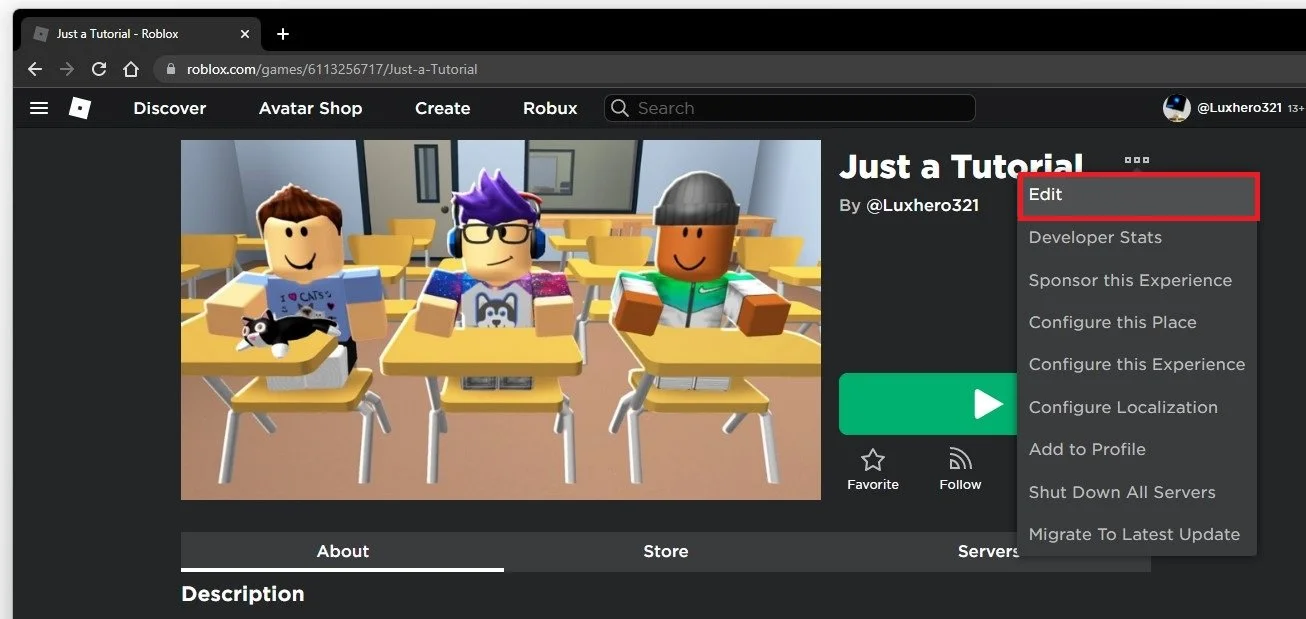
Can I record my game while playing in Roblox Studio test mode?
Yes, you can record while in Roblox Studio's test mode (e.g., 'Play Solo' or 'Run'). The built-in recorder functions during these simulation modes, allowing you to capture gameplay, debug sessions, or showcase features as they would appear to players. Just activate the recorder before entering the test mode or during.
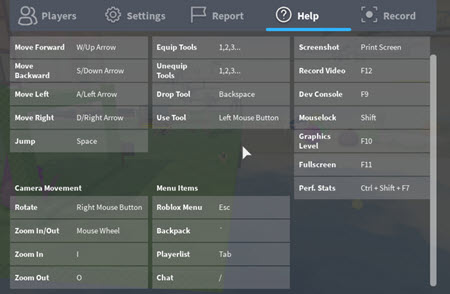
Are there any keyboard shortcuts for recording in Roblox Studio?
Roblox Studio's built-in recorder doesn't typically have widely publicized or customizable keyboard shortcuts for starting/stopping recordings. You usually have to click the record and stop buttons within the UI. For hotkey functionality, external recording software like OBS Studio or NVIDIA ShadowPlay offers extensive shortcut customization.
Master Roblox Studio record settings, optimize video quality, adjust frame rate and resolution, troubleshoot recording issues, enhance content creation, improve workflow efficiency, understand file size management, integrate audio settings for clear capture.
35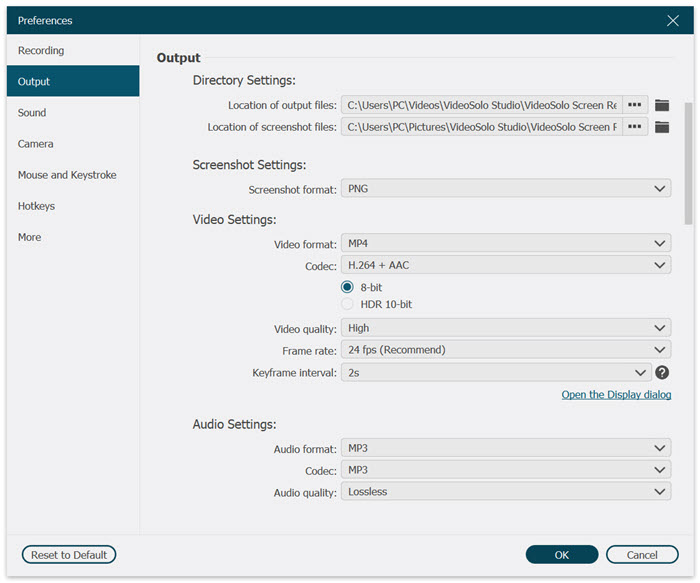


Top 5 Ways On How To Record On Roblox 2026 Videosolo Screen Recorder Preference Output . Client Does Not Have Input Option Even While Having A Microphone . How To Record Roblox With OBS Studio Best Settings For Smooth . How To Change Roblox Game Settings Tech How Roblox Studio Game Settings. 5 Ways How To Record On Roblox All Devices Roblox Recording


How To Make Settings Roblox Studio YouTube . How To Make A Settings UI In Roblox Studio YouTube . How To Screen Record On Roblox Cross Device Guide Roblox Record Feature . How To Change Graphics Settings In Studio In Run Mode Platform Usage . How To Record Roblox On Any Device 6 Easy Ways Roblox Recorder Stop Recording 300x175


How To Make A SETTINGS GUI ADVANCED ROBLOX STUDIO 2024 YouTube . Roblox OS Settings Explained Simply 4 Roblox Video Settings. How To Adjust Game Settings In Roblox Studio YouTube . How To Record Roblox Studio Using OBS Studio YouTube . How To Record Roblox On Mac With Sound 2026 Record Roblox With Obs Studio


Experienced Pc User Skill Required How To Revert To The Old Roblox . How To Reset All Roblox Studio Settings YouTube Hqdefault . How To Record On Roblox Start Recording . Creating UI How To Make A Basic Settings GUI In Roblox Studio Part 1 . Roblox Studio How To Make A Settings System YouTube


Roblox Studio How To Change Maximum Player Count Tech How 4 Edit Game Settings. How To Record Roblox Studio Without OBS YouTube . 5 Ways How To Record On Roblox All Devices Easeus Recexperts Video Audio Settings . How To Change Studio Settings Roblox Studio YouTube . Roblox OS Settings Explained Simply


How To Change Settings And Layout Roblox Studio YouTube Hqdefault . Roblox Controls And Settings Guide MyGameDesk Com June 2026 2025 05 26 20 39 31 . How To Change Roblox Game Settings Tech How 9 Edit Creation. How To Create Settings In Roblox Studio How To Make Settings UI In . 5 Ways How To Record On Roblox All Devices Recexperts Game Recording Settings

Roblox Studio Detailed Beginner S Guide For Roblox Game Creator Screen Shot 2022 12 20 At 1.49.27 PM . How To Record Roblox With OBS Studio Complete Setup Guide Fast . Roblox Studio How To Change Maximum Player Count Tech How 2 Edit Roblox Place. How Do You Record On Roblox In 2025 Desktop Mobile How Do You Record On Roblox 12 . Enable Dark Mode In Roblox Studio Tutorial Tech How 3 Studio General Settings